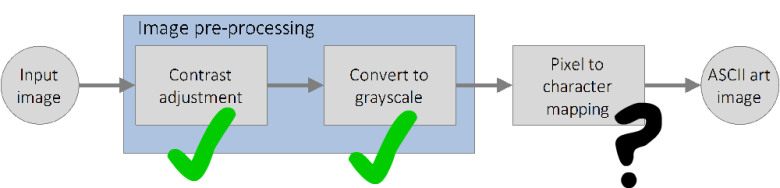
Today’s post is the second and last on how to convert images to ASCII art (in case you missed it and want to quickly catch up, here’s part 1). We already have a grayscale version of the image we want to convert and we have also developed a method that allows the user to adjust the contrast of the image. What we have to implement now is the mapping from the grayscale version of the input image to the ASCII art image. This is what, without further ado, we will discuss below.
Mapping pixels to ASCII characters
Since what defines the grey level of a pixel in a grayscale image is its intensity value, we have to find a way that allows us to relate or match ASCII characters and intensity values.
It is obvious then that the inputs of the mapping will be intensity values and the outputs ASCII characters. I hope you agree in that a good way to do this mapping is to:
- Associate an intensity value to each of the 95 printable ASCII characters. The “darker” the character, the lower its associated intensity value (remember that 0 is black and 255 white). This means that the intensity value associated to the character “#” should be closer to 0 than the intensity value of the character “-” since “#” is “darker” than “-”. We’ll see what “darker” means in a moment. Note that this step has to be done only once and that it can be done at the initialization of the program.
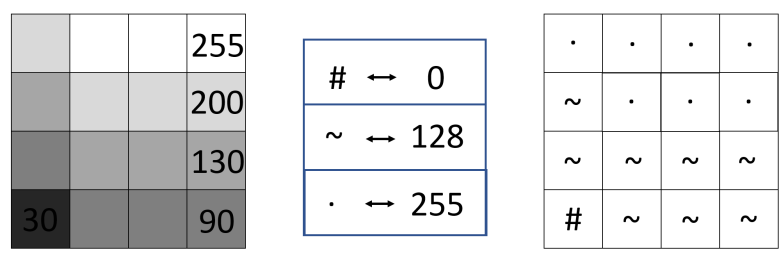
- Iterate over the pixels of the image and, for each pixel’s intensity, look up which is the intensity value from the table created in step 1 that is closer to the current pixel’s intensity.
- Once this match is found we simply have to retrieve the ASCII character associated to the intensity and substitute the pixel for the ASCII character.
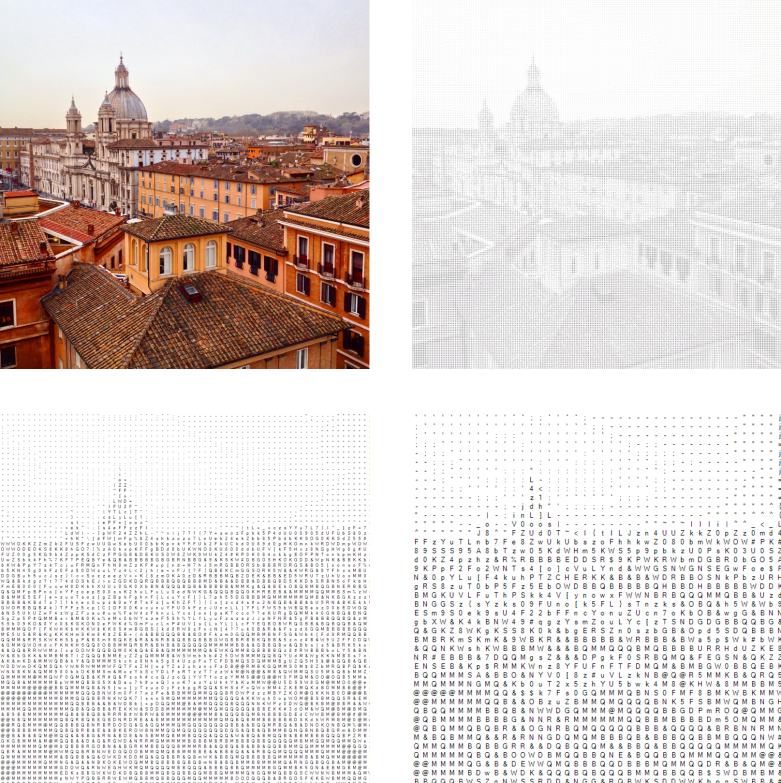
A simplified version of this process can be seen in the Figure below.
The pseudocode for the transformation will be then:
For i <= Image Height
	For j <= Image Width
                Retrieve grayscale intensity at (i,j) -> G(i,j)
		Find min(abs(G(i,j) – ASCII intensity table))
		Get the associated ASCII character
		Draw the ASCII character at (i,j)
Bearing this in mind, what we have to do now before implementing the actual mapping is to develop a method by which we can associate an intensity to each printable ASCII character.
Assigning intensities to ASCII characters
The method I chose for assigning an intensity value to each printable ASCII character is explained below, but let me introduce first an important consideration. This is that, to obtain a good and aesthetic result, the proportions of the original image have to be maintained on the generated ASCII image. To achieve this I decided that each drawn character, independently of its size (“X” needs more space to be drawn that ”.”) would have the same amount of space (a square patch of cxc pixels) assigned in the output image. And that the amount of space assigned to all characters would be that of the character that needs more space to be drawn. By doing this we guarantee that proportions are maintained through the transformation (although the image increases it size by a factor of c2. We’ll see how to solve this later.) We can obtain the size of the patch via:
private static SizeF GetGeneralSize()
{
        SizeF generalsize = new SizeF(0, 0);
        for (int i = 32; i <= 126; i++) // Iterate through contemplated characters calculating necessary width
        {
           char c = Convert.ToChar(i);
           // Create a dummy bitmap just to get a graphics object
           Image img = new Bitmap(1, 1);
           Graphics drawing = Graphics.FromImage(img);

           // Measure the string to see its dimensions using the graphics object
           SizeF textSize = drawing.MeasureString(c.ToString(), System.Drawing.SystemFonts.DefaultFont);
           // Update, if necessary, the max width and height
           if (textSize.Width > generalsize.Width)
               generalsize.Width = textSize.Width;
           if (textSize.Height > generalsize.Height)
               generalsize.Height = textSize.Height;
           // free all resources
           img.Dispose();
           drawing.Dispose();
        }
        // Make sure generalsize is made of integers
        generalsize.Width = ((int)generalsize.Width);
        generalsize.Height = ((int)generalsize.Height);
        // and that size defines a square to maintain image proportions
        if (generalsize.Width > generalsize.Height)
            generalsize.Height = generalsize.Width;
        else
            generalsize.Width = generalsize.Height;

        return generalsize;
}
Where generalsize will hold the size of the patch. Now, knowing the occupied space in the output image of any character also eases our way of implementing a method that associates an intensity to any character. We can define a ratio that measures the greyness of each character by dividing the number of black pixels over the above computed patch size.
Character greyness = (amount of black pixels)/( c2)
Once we have the ratio computed for all printable ASCII characters we just have to remap the values to the range 0-255 so that they can be matched with pixel intensities. The following two functions compute this ratio and perform the above-mentioned mapping. The first one computes the ratio of each character:
private static double GetWeight(char c, SizeF size)
{
        var CharImage = HelperMethods.DrawText(c.ToString(), Color.Black, Color.White, size);

        Bitmap btm = new Bitmap(CharImage);
        double totalsum = 0;

        for (int i = 0; i < btm.Width; i++)
        {
            for (int j = 0; j < btm.Height; j++)
            {
                totalsum = totalsum + (btm.GetPixel(i, j).R
                                    + btm.GetPixel(i, j).G
                                    + btm.GetPixel(i, j).B)/3;
             }
        }
        // Weight = (sum of (R+G+B)/3 for all pixels in image) / Area. (Where Area = Width*Height )
        return totalsum / (size.Height * size.Width);
}
And this second one, once the all weights have been computed, maps them to the desired range:
private static List LinearMap(List characters)
{
   double max = characters.Max(c => c.Weight);
   double min = characters.Min(c => c.Weight);
   double range = 255;
   // y = mx + n (where y c (0-255))
   double slope = range / (max - min);
   double n = -min * slope;
   foreach(WeightedChar charactertomap in characters)
   {
	   charactertomap.Weight = slope * charactertomap.Weight + n;
   }
   return characters;
}
Finally, we can define another function that will be called when the program starts that performs all these tasks and returns a list of all the printable characters with its associated weights already mapped to the range 0-255. The class WeightedChar stores the character, its weight and the image of the character above a white patch of cxc pixels.
public static List GenerateFontWeights() // Collect chars, their Images and weights in a list of WeightedChar
{
	List WeightedChars = new List();

	SizeF commonsize = GetGeneralSize(); // Get standard size (nxn square), which will be common to all CharImages

	for (int i = 32; i <= 126; i++) // Iterate through Chars
	{
		var forweighting = new WeightedChar(); // New object to hold Image, Weight and Char of new character
		char c = Convert.ToChar(i);
		if (!char.IsControl(c))
		{
			forweighting.Weight = GetWeight(c, commonsize); // Get character weight
			forweighting.Character = c.ToString(); // Get character representation (the actual char)
			forweighting.CharacterImage = (Bitmap)HelperMethods.DrawText(c.ToString(), Color.Black, Color.White, commonsize); // Get character Image
		}
		WeightedChars.Add(forweighting);
	}

	WeightedChars = LinearMap(WeightedChars); // Linearly map character weights to be in the range 0-255 -> mapping linearly from: MinCalcWeight - MaxCalcWeight to 0-255;
											  // This is done to be able to directly map pixels to characters
	return WeightedChars;
}
One character per pixel?
Now, there is at least one problem with the method we have developed thus far. It is that, for a mxn image, the resulting ASCII image dimensions will be, in pixels, mxnxc2, which might be many times bigger than the original image. As a consequence, when the image gets squeezed to fit in the screen the characters might not be seen clearly. This is, from my point of view, something that should not be left ignored, since the whole point is that the characters are visible.
Luckily, this can be easily solved by, instead of performing a one to one map, mapping a neighbourhood of pxq pixels to a single character by, instead of using the intensity of one pixel as the input for the mapping, using the average intensity of the pxq neighbourhood. This is totally a subjective point as the first mapping (one to one) will obviously maintain more details of the original image. So, why not let the user play with this parameters and choose the ones he prefers?
Taking this point into consideration, the final function that generates the ASCII image can be easily defined as shown below:
public static Image Convert2ASCII(Image BW_Image, int? w, int? h, List<WeightedChar> characters, out List<List<string>> ResultText)
{

	/*
	 * ALGORITHM:
	 *
	 *  1- Get target Image size (w=Width,h=Height)
	 *  2- Create Result Image with white background and size W = w*character_image_width
	 *                                                        H = h*character_image_height
	 *  3- Create empty string to hold the text
	 *
	 *  4- for (int j=0;j=target_Image_Height;j++) --> ALL ROWS
	 *       5- Create row text string
	 *       for (int i=0;i=target_Image_Width;i++) --> ALL COLUMNS
	 *          6- Get target pixel weight
	 *          7- Get closest weight from character list
	 *          8- Paste character image in position w = i*character_image_width
	 *                                               h = j*character_image_height
	 *            ¡¡ Be careful with coordinate system when placing Images !!
	 *          9- Add (string)character to row text string
	 *       10- Add row text string to text holding string
	 *  11 - return resulting Image & Text
	 */

	if (w == null & h == null)
	{
		w = 1;
		h = 1;
	}
	int width = (int)w;
	int height = (int)h;

	// Be careful when Image.Width/widh or Image.Height/height are not integer values (coherent approximations)
	Image ResultImage = new Bitmap(BW_Image.Width * characters[0].CharacterImage.Width/width, BW_Image.Height * characters[0].CharacterImage.Height/height);
	Graphics drawing = Graphics.FromImage(ResultImage);
	drawing.Clear(Color.White);
	ResultText = new List<List<string>> { };
	Bitmap BlackAndWhite = (Bitmap)BW_Image;

	for (int j = 0; j < BW_Image.Height; j+=height) // ROW
	{
		List<string> RowText = new List<string> { };
		for (int i=0; i <BW_Image.Width; i+=width) // COLUMN
		{
			double targetvalue = 0;

			for (int nj=j; nj<j+height; nj++)
			{
				for (int ni = i; ni < i+width; ni++)
				{
					// Sum all the pixels in neighbourhood and average
					try
					{
						targetvalue += BlackAndWhite.GetPixel(ni, nj).R;
					}
					catch (Exception)
					{
						targetvalue += 128;
					}
				}
			}
			targetvalue /= (width * height);
			WeightedChar closestchar = characters.Where(t=>Math.Abs(t.Weight-targetvalue)==characters.Min(e => Math.Abs(e.Weight - targetvalue))).FirstOrDefault();
			RowText.Add(closestchar.Character);
			drawing.DrawImage(closestchar.CharacterImage, (i/width) * closestchar.CharacterImage.Width, (j/height) * closestchar.CharacterImage.Height);
		}
		ResultText.Add(RowText);
	}
	drawing.Dispose();
	return (Image)ResultImage;
}
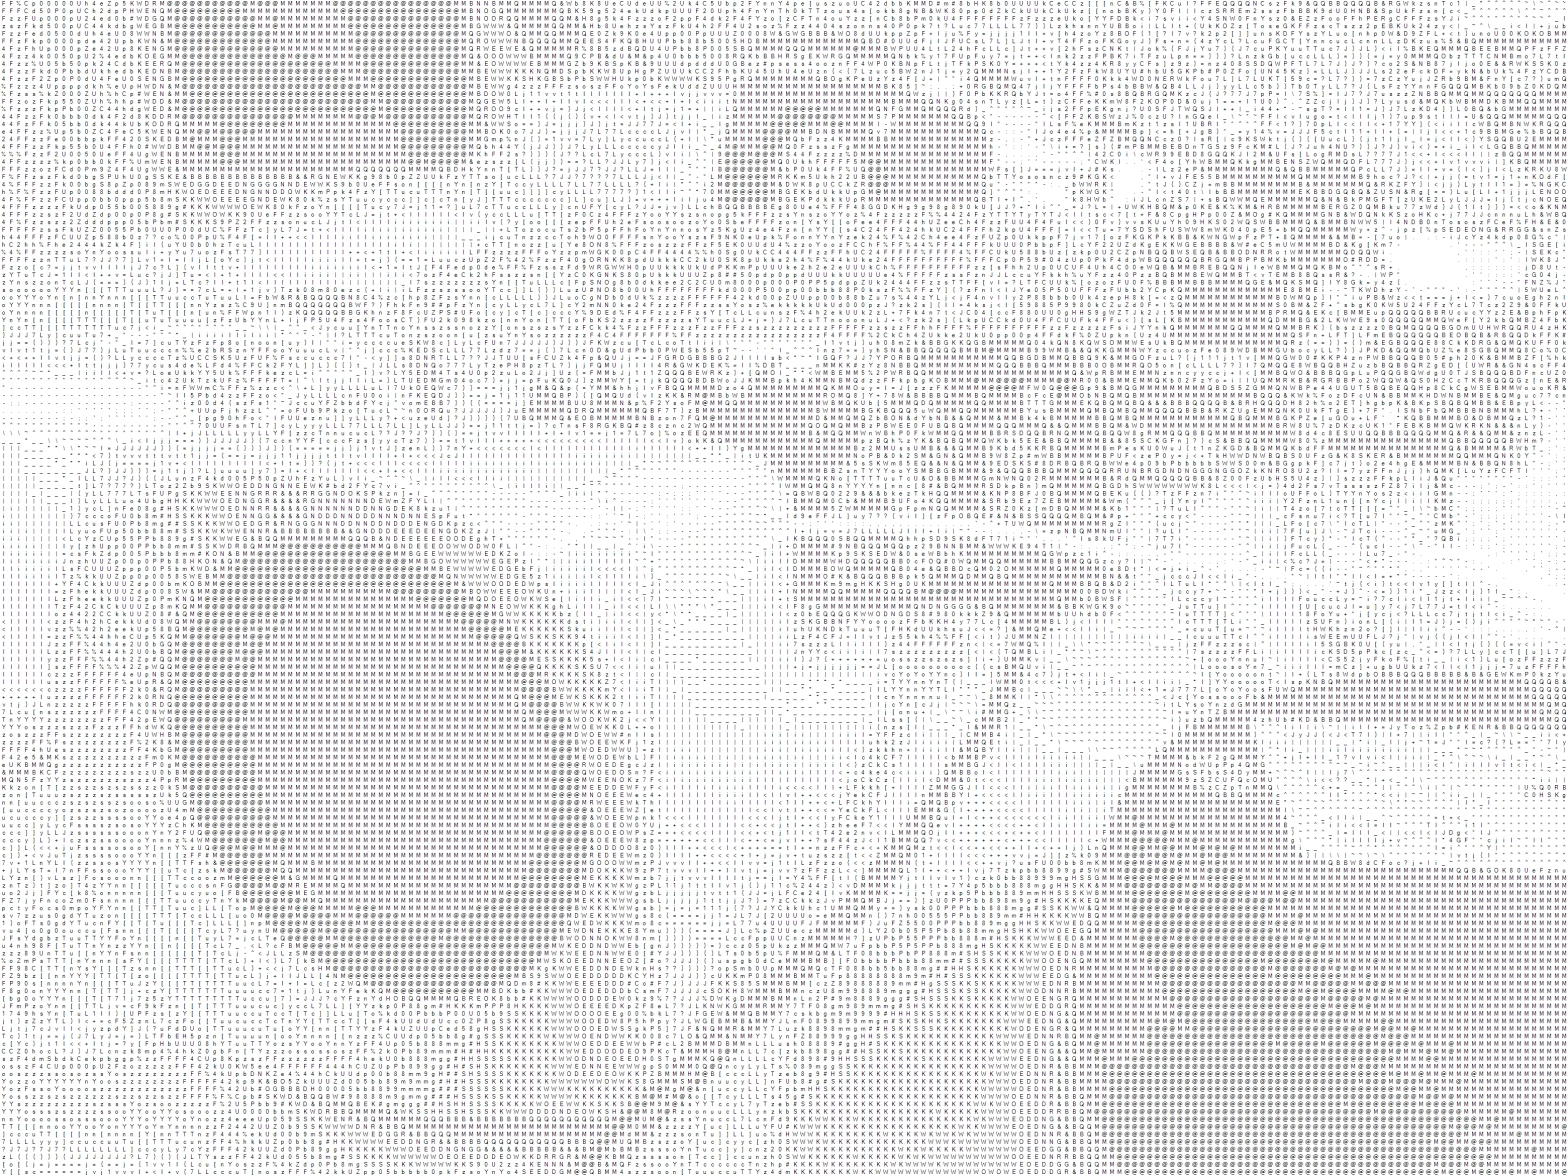
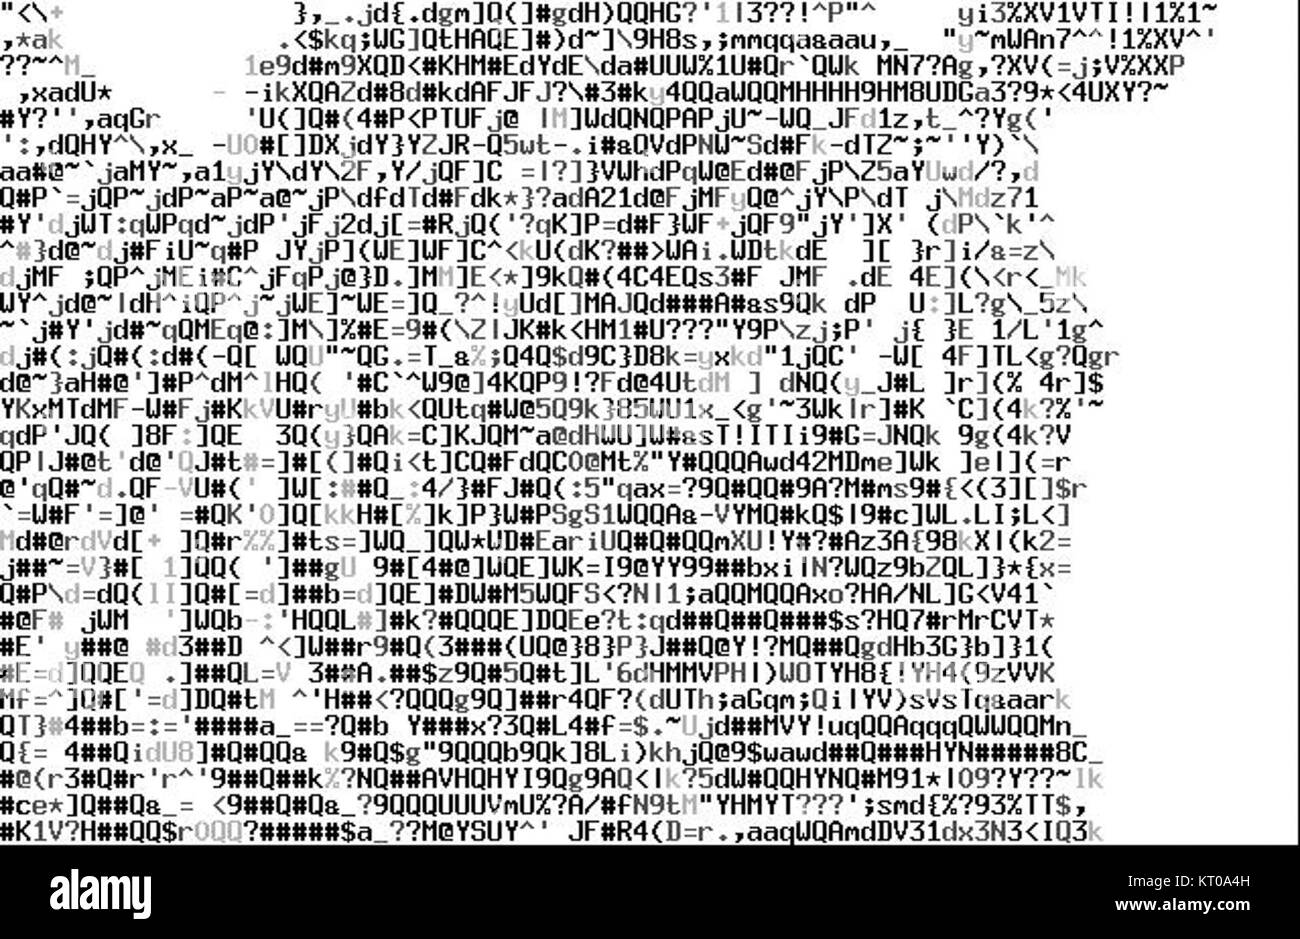
The following Figure shows the obtained results for different neighbourhood sizes.
Final notes
There are many improvements that could be done to make the program more efficient and more functionalities could be implemented. However, I will let those improvements to you, and what has been explained here should be enough to get you started.
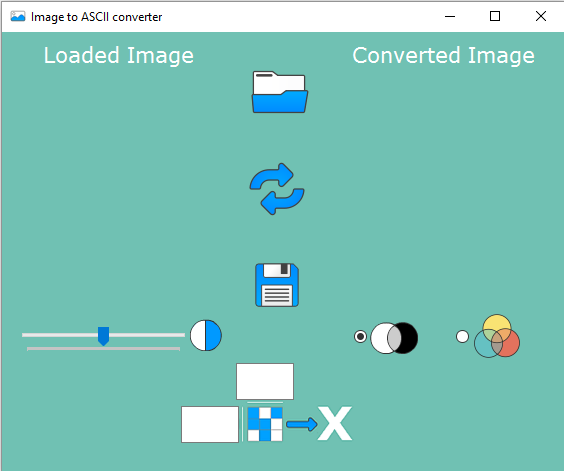
Finally, any positive/constructive criticism is welcome and, for those interested, this version of the project can be found here and the code can also be found here.

I see methods clearer than this, and i wonder whats happening in these ones.
I tried matching the letter shape to the shape of the pixel segment, but it didnt come out as good either. Do u know how they make the more higher quality ones?
(like this.)
LikeLike
https://art.pixlab.io/rib_out.png <-heres another one, thats freakishly good for its resolution. ? i wonder what the method is?
LikeLike
Hi Magnus,
There are two things that come to my mind just by taking a quick look to the links you point out.
The first one is the type of font they are using, which seems to be some sort of typewriter font. It is different to the one I used and it might improve the results since it leaves nearly no spaces between letters.
The second thing is that, at least in the first link, they are not only playing with ASCII characters but also with the darkness of the character.
LikeLike